Summary: in this tutorial, you will learn how to copy objects in JavaScript, including shallow copy and deep copy. To copy an object in JavaScript, you have three options:
Use the spread (...) syntax
Use the Object.assign() method
Use the JSON.stringify() and JSON.parse() methods
The following illustrates how to copy an object using three methods above:
const person = {
firstName: 'John',
lastName: 'Doe'
};
// using spread ...let p1 = {
...person
};
// using Object.assign() methodlet p2 = Object.assign({}, person);
// using JSONlet p3 = JSON.parse(JSON.stringify(person));
Code language:JavaScript(javascript)
Both spread (...) and Object.assign() perform a shallow copy while the JSON methods carry a deep copy.
Shallow copy vs. deep copy
In JavaScript, you use variables to store values that can be primitive or references. When you make a copy of a value stored in a variable, you create a new variable with the same value. For a primitive value, you just simply use a simple assignment:
let counter = 1;
let copiedCounter = counter;
Code language:JavaScript(javascript)
And when you change the value of the copied variable, the value of the original remains the same.
copiedCounter = 2;
console.log(counter);
Code language:JavaScript(javascript)
Output:
1
However, if you use the assignment operator for a reference value, it will not copy the value. Instead, both variables will reference the same object in the memory:
let person = {
firstName: 'John',
lastName: 'Doe'
};
let copiedPerson = person;
Code language:JavaScript(javascript)
And when access the object via the new variable (copiedPerson) and change the value of its property (name), you change the value of the property of the object.
A deep copying means that value of the new variable is disconnected from the original variable while a shallow copy means that some values are still connected to the original variable.
The reason is that the address is reference value while the first name is a primitive value. Both person and copiedPerson references different objects but these objects reference the same address objects.
Deep copy example
The following snippet replaces the Object.assign() method by the JSON methods to carry a deep copy the person object:
In this example, all values in the copiedPerson object are disconnected from the original person object. In this tutorial, you have learned how to copy objects in JavaScript using either shallow or deep copy.
Editor’s note: This React Redux tutorial was last updated on 28 January 2021 to include a section on Redux middleware and remove outdated information.
With the number of tools and libraries out there for web development (a JavaScript library was probably released before you finished reading this), it might not be the wisest thing to jump on every new one without really understanding its benefits or why you should use it.
Redux isn’t new, but it remains quite popular. In this tutorial, we’ll show you what Redux is, why you should use it, and how it works.
First, we’ll review the basics of Redux and how it functions. Then we will see how using Redux can help you in your app by using a simple but practical component.
We don’t just write about Redux, we talk about it too. Listen now:
Or subscribe for later
What is Redux?
Redux is a predictable state container designed to help you write JavaScript apps that behave consistently across client, server, and native environments and are easy to test.
While it’s mostly used as a state management tool with React, you can use it with any other JavaScript framework or library. It’s lightweight at 2KB (including dependencies), so you don’t have to worry about it making your application’s asset size bigger.
With Redux, the state of your application is kept in a store, and each component can access any state that it needs from this store.
If you’re just getting started with Redux, the video below is a great resource for beginners.
When to use Redux
Lately one of the biggest debates in the frontend world has been about Redux. Not long after its release, Redux became one of the hottest topics of discussion. Many favored it while others pointed out issues.
Redux allows you to manage your app’s state in a single place and keep changes in your app more predictable and traceable. It makes it easier to reason about changes occurring in your app. But all of these benefits come with tradeoffs and constraints. One might feel it adds up boilerplate code, making simple things a little overwhelming; but that depends upon the architecture decisions.
One simple answer to this question is you will realize for yourself when you need Redux. If you’re still confused as to whether you need it, you don’t. This usually happens when your app grows to the scale where managing app state becomes a hassle; and you start looking out for making it easy and simple.
What is state management in Redux?
State management is essentially a way to facilitate communication and sharing of data across components. It creates a tangible data structure to represent the state of your app that you can read from and write to. That way, you can see otherwise invisible states while you’re working with them.
Most libraries, such as React, Angular, etc. are built with a way for components to internally manage their state without any need for an external library or tool. It does well for applications with few components, but as the application grows bigger, managing states shared across components becomes a chore.
In an app where data is shared among components, it might be confusing to actually know where a state should live. Ideally, the data in a component should live in just one component, so sharing data among sibling components becomes difficult.
For instance, in React, to share data among siblings, a state has to live in the parent component. A method for updating this state is provided by the parent component and passed as props to these sibling components.
Here’s a simple example of a login component in React. The input of the login component affects what is displayed by its sibling component, the status component:
classAppextendsReact.Component{constructor(props){super(props);// First the Parent creates a state for what will be passedthis.state ={ userStatus:"NOT LOGGED IN"}this.setStatus =this.setStatus.bind(this);}// A method is provided for the child component to update the state of the// userStatus
setStatus(username, password){const newUsers = users;
newUsers.map(user =>{if(user.username == username && user.password === password){this.setState({
userStatus:"LOGGED IN"})}});}
render(){return(<div>// the state is passed to the sibling as a props as is updated whenever// the child component changes the input<Status status={this.state.userStatus}/>// this method is passed to the child component as a props which it// uses to change the state of the userStatus<Login handleSubmit={this.setStatus}/></div>);}});
Remember, this data is not needed by the parent component, but because its children need to share data, it has to provide a state.
Now imagine what happens when a state has to be shared between components that are far apart in the component tree. The state has to be passed from one component to another until it gets to where it is needed.
Basically, the state will have to be lifted up to the nearest parent component and to the next until it gets to an ancestor that is common to both components that need the state, and then it is passed down. This makes the state difficult to maintain and less predictable. It also means passing data to components that do not need it.
It’s clear that state management gets messy as the app gets complex. This is why you need a state management tool like Redux that makes it easier to maintain these states. Let’s get a good overview of Redux concepts before considering its benefits.
How Redux works
The way Redux works is simple. There is a central store that holds the entire state of the application. Each component can access the stored state without having to send down props from one component to another.
There are three building parts: actions, store, and reducers. Let’s briefly discuss what each of them does. This is important because they help you understand the benefits of Redux and how it’s to be used. We’ll be implementing a similar example to the login component above but this time in Redux.
Actions in Redux
Simply put, actions are events. They are the only way you can send data from your application to your Redux store. The data can be from user interactions, API calls, or even form submissions.
Actions are sent using the store.dispatch() method. Actions are plain JavaScript objects, and they must have a type property to indicate the type of action to be carried out. They must also have a payload that contains the information that should be worked on by the action. Actions are created via an action creator.
Here’s an example of an action that can be carried out during login in an app:
As explained earlier, the action must contain the type property and then the other payload to be stored.
Reducers in Redux
Reducers are pure functions that take the current state of an application, perform an action, and return a new state. These states are stored as objects, and they specify how the state of an application changes in response to an action sent to the store.
It is based on the reduce function in JavaScript, where a single value is calculated from multiple values after a callback function has been carried out.
Here is an example of how reducers work in Redux:
constLoginComponent=(state = initialState, action)=>{switch(action.type){// This reducer handles any action with type "LOGIN"case"LOGIN":return state.map(user=>{if(user.username !== action.username){return user;}if(user.password == action.password){return{...user,login_status:"LOGGED IN"}}});default:return state;}};
Reducers take the previous state of the app and return a new state based on the action passed to it.
As pure functions, they do not change the data in the object passed to them or perform any side effect in the application. Given the same object, they should always produce the same result.
Store in Redux
The store holds the application state. It is highly recommended to keep only one store in any Redux application. You can access the state stored, update the state, and register or unregister listeners via helper methods.
Let’s create a store for our login app:
const store = createStore(LoginComponent);
Actions performed on the state always return a new state. Thus, the state is very easy and predictable.
Now that we know a little more about Redux, let’s go back to our login component example that was implemented earlier and see how Redux can improve the component.
With Redux, there’s one general state in the store, and each component has access to the state. This eliminates the need to continuously pass state from one component to another. You can also select the slice from the store for a particular component; this makes your app more optimized.
Redux middleware
Redux allows developers to intercept all actions dispatched from components before they are passed to the reducer function. This interception is done via middlewares.
Building on the example Login component discussed in the last section, we might want to sanitize the user’s input before it reaches our store for further processing. This can be achieved via Redux middleware.
Technically, middlewares are functions that call the next method received in an argument after processing the current action. These are called after every dispatch.
Here’s what a simple middleware looks like:
functionsimpleMiddleware({ getState, dispatch }){returnfunction(next){returnfunction(action){// processingconst nextAction =next(action);// read the next stateconst state = getState();// return the next action or you can dispatch any other actionreturn nextAction;}}}
This might look a little overwhelming, but in most cases, you might not need to create your own middleware since the huge Redux community has already made a number of them available. If you feel middleware is required, you will enjoy it because it gives you a lot of power to do tons of great work with the best abstraction.
Why use Redux?
When using Redux with React, states will no longer need to be lifted up. This makes it easier for you to trace which action causes any change.
As you can see in the example above, the component does not need to provide any state or method for its children components to share data among themselves. Everything is handled by Redux. This greatly simplifies the app and makes it easier to maintain.
This is the primary reason why you should use Redux, but it’s not the only benefit. Take a look at the list below for a summary of what you stand to gain by using Redux for state management.
Redux makes the state predictable
In Redux, the state is always predictable. If the same state and action are passed to a reducer, the same result is always produced because reducers are pure functions. The state is also immutable and is never changed. This makes it possible to implement arduous tasks like infinite undo and redo. It is also possible to implement time travel — that is, the ability to move back and forth among the previous states and view the results in real time.
Redux is maintainable
Redux is strict about how code should be organized, which makes it easier for someone with knowledge of Redux to understand the structure of any Redux application. This generally makes it easier to maintain. This also helps you segregate your business logic from your component tree. For large scale apps, it’s critical to keep your app more predictable and maintainable.
Debugging is easy in Redux
Redux makes it easy to debug an application. By logging actions and state, it is easy to understand coding errors, network errors, and other forms of bugs that might come up during production.
Besides logging, it has great DevTools that allow you to time-travel actions, persist actions on page refresh, etc. For medium- and large-scale apps, debugging takes more time then actually developing features. Redux DevTools makes it easy to taker advantage of all Redux has to offer.
Performance Benefits
You might assume that keeping the app’s state global would result in some performance degradation. To a large extent, that’s not the case.
React Redux implements many performance optimizations internally so that your own connected component only rerenders when it actually needs to.
Ease of testing
It is easy to test Redux apps since functions used to change the state of pure functions.
State persistence
You can persist some of the app’s state to local storage and restore it after a refresh. This can be really nifty.
Server-side rendering
Redux can also be used for server-side rendering. With it, you can handle the initial render of the app by sending the state of an app to the server along with its response to the server request. The required components are then rendered in HTML and sent to the clients.
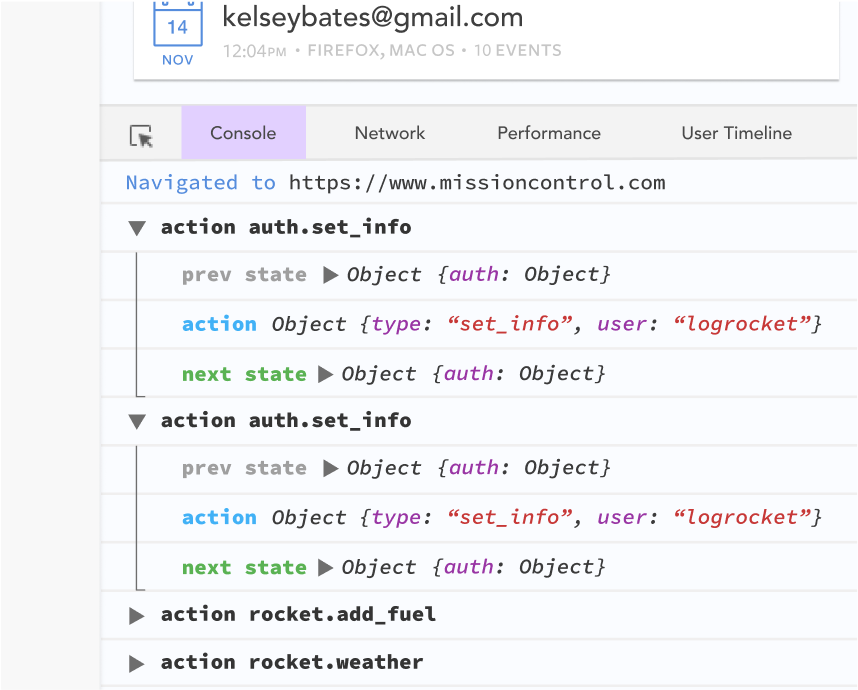
Implementing Redux in your app? Track Redux state and actions with LogRocket
Debugging React applications can be difficult, especially when there is complex state. If you’re interested in monitoring and tracking Redux state for all of your users in production, try LogRocket.
LogRocket is like a DVR for web apps, recording literally everything that happens on your site. Instead of guessing why problems happen, you can aggregate and report on what state your application was in when an issue occurred.
The LogRocket Redux middleware package adds an extra layer of visibility into your user sessions. LogRocket logs all actions and state from your Redux stores.
We have discussed the major features of Redux and why Redux is beneficial to your app. While Redux has its benefits, that does not mean you should go about adding Redux in all of your apps. Your application might still work well without Redux.
One major benefit of Redux is to add direction to decouple “what happened” from “how things change.” However, you should only implement Redux if you determine your project needs a state management tool.


 Remember, this data is not needed by the parent component, but because its children need to share data, it has to provide a state.